You might be looking for a Windows zip program if you are currently unable to interact with .zip files on your computer, or if you need to do something with .zip files that isn’t possible with the default Windows zip utility. There are several good, free zip programs, like 7-Zip or PeaZip that might provide you with the functionality that you need, but if you are having difficulty using the default Windows zip program, then you might be trying to figure out what happened to it. Typically you can use the Default Programs menu in Windows 7 if you want to make changes to the default applications that open a particular file type. However, if your computer does not have a .zip option on the Associate a file type or protocol with a program menu, it can be difficult to discern how to restore the Windows 7 default ZIP program. This can be particularly frustrating if you had downloaded another program to manage your compressed files, but have already uninstalled that program from your computer. Fortunately the process of restoring Windows Explorer as the default program for opening ZIP files is fairly straightforward, and there are several different ways in which you can restore this file association.
How to Set the Windows Zip Program Using the Shortcut Menu
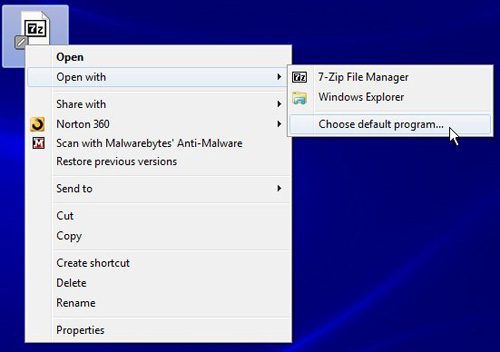
The ideal, and simplest, method for restoring your default ZIP folder association in Windows 7 is through the use of the shortcut menu that opens when you right-click on a ZIP file. To restore your default ZIP association with this method, right-click on a ZIP file, click Open With, then click Choose default program. Click Windows Explorer at the top of the window that opens, then click the OK button at the bottom of the window to restore Windows Explorer as the Windows 7 default ZIP program.
If this method works for you, then you are done! However, if you have found this article, then there is a strong possibility that your solution may not be this simple.
Summary – How to set the default zip program in Windows 7
How to Set the Default Windows 7 Zip Program Using the Command Prompt
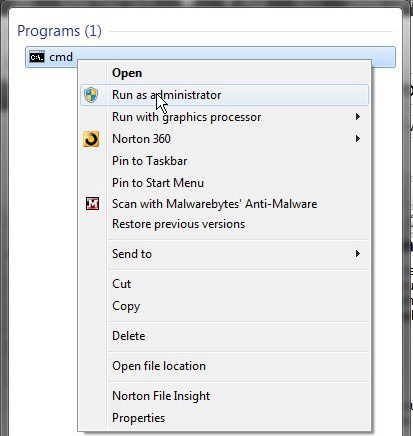
The solution that will probably be the most effective for those that failed with the shortcut menu involves the use of the command prompt. You can open the command prompt by clicking the Start button at the bottom-left corner of your computer screen, then typing cmd into the search field at the bottom of the menu. Right-click the cmd result at the top of the window, then click Run as administrator.
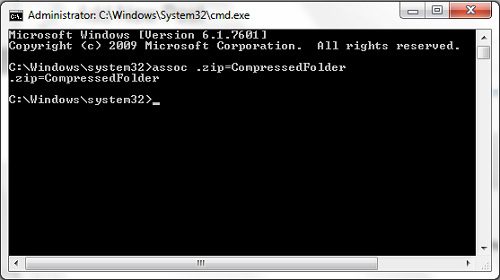
When the command prompt window opens, type assoc .zip=CompressedFolder into the window, then press Enter on your keyboard.
You should then restart your computer to make sure that the changes have been applied to your system.
Summary – How to set the default .zip program in Windows 7 from the command prompt
One final thing to consider is downloading a third-party program that can effectively handle any compressed file type that you throw at it. Many people encounter problems with ZIP files because they download trial versions of programs and remove them instead of purchasing a license for the full version. However, there are powerful, free alternatives for opening compressed files in Windows 7. Two of my favorites are 7-Zip and PeaZip. These options are effective and free, and worth looking into if you are not happy using Windows Explorer as the Windows 7 default ZIP program. After receiving his Bachelor’s and Master’s degrees in Computer Science he spent several years working in IT management for small businesses. However, he now works full time writing content online and creating websites. His main writing topics include iPhones, Microsoft Office, Google Apps, Android, and Photoshop, but he has also written about many other tech topics as well. Read his full bio here.
You may opt out at any time. Read our Privacy Policy