But it’s also really easy to make a mistake because many of the times you do this will involve a lot of very similar-looking files. Luckily there is a combine CSV files command line option that you can utilize which can automate this process for you, which will both save time and reduce mistakes.
How to Merge CSV Files in Windows 7
Our article continues below with additional information on combining CSV files in Windows, including pictures of these steps. If you regularly download CSV files from a database, or receive a number of CSV files containing similar information, you might need to combine all of those files into one larger file. The ability to merge CSV files automatically can be a big time and sanity saver, almost as much as setting a print area in Excel to fix a spreadsheet that isn’t printing well. I recently encountered a situation where I had a large amount of data that was split up into about 100 different CSV files, each of which contained the same number of rows with the same type of data in each row. Each CSV file represented an order from a company, and my company needed to be able to quickly sort all of that data into one file. The combined data could then be organized into a pivot table so that our production team knew how much of each product they needed to make. Your reasons for doing this may vary, but it can be the simplest solution if you need to combine and sort a lot of data. Rather than opening each file individually, then copying and pasting all of the data into one file, you can automate the process with the command prompt. Having witnessed someone manually copy and paste all of the data from multiple CSV files into one CSV file, I know that the ability to merge CSV files is one that can be a huge time saver.
How to Combine Multiple CSV Files Into One File in Windows 7 (Guide with Pictures)
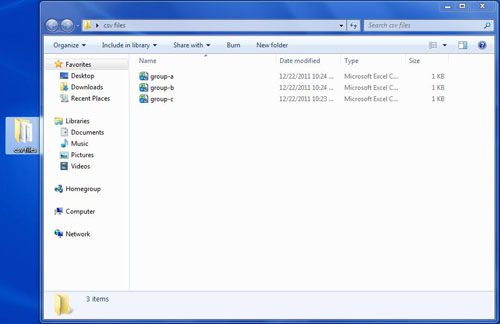
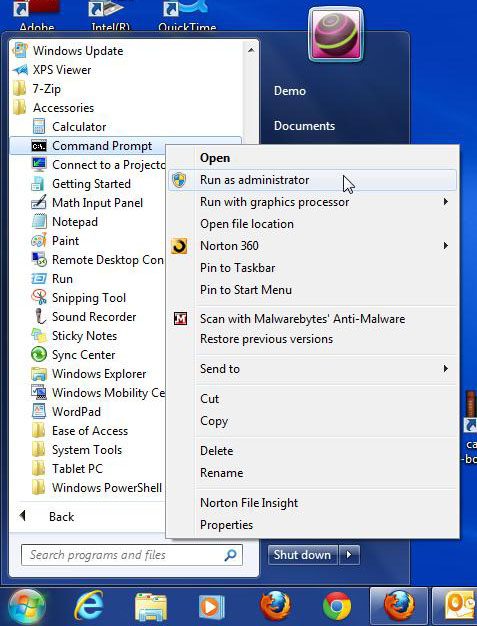
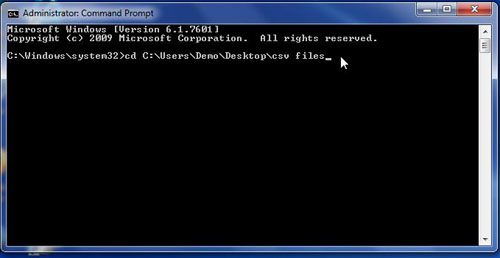
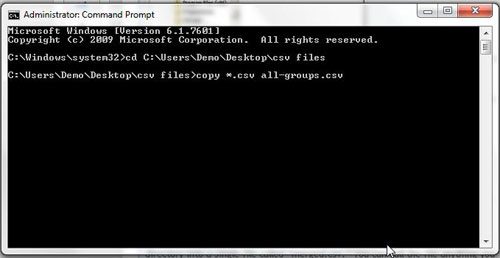
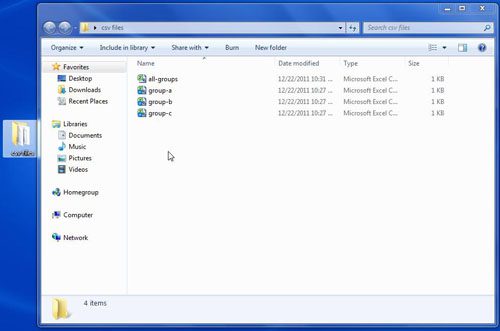
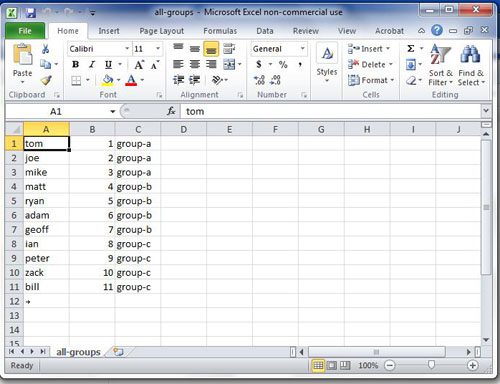
The steps in this article were performed in Microsoft Windows 7, but will also work in newer versions of the Windows operating system, including Windows 10. Now that you have completed our combine CSV files command line tutorial you will be able to apply this method to groups o files that you have on your own computer and quickly generate one large, combined file that contains all of their information. This file does not need to be on your Desktop, but I typically put mine there for the sake of simplicity. Take note of the location, however, as you will need to reference it later. Additionally, once you have finished the merge CSV files process, the output CSV file will also be located in this same folder. You can also type “cmd” into the search field at the bottom of the Start menu, which will bring up the command prompt as a search result. You can then right-click the Command Prompt search result, then click Run as Administrator. If you look at the image above, you will see that my folder is called “csv files” and is located on the Desktop of a user that I have called “Demo.” You can also find the folder location by right-clicking the folder, then clicking Properties. Alternatively, you could hold down Shift, then right-click the folder and choose “Copy as path.” So the line of data that you are typing might look something like this – cd C:\Users\Demo\Desktop\csv files You can change the output file name from “all-groups.csv” to whatever file name you wish. The name that you select in this step is going to be the name of the large file containing all of your merged CSV files. It will be in the same folder, with the name that you specified in step 4 above. In the image above, note that I’ve specified in the third column which file originally contained that line of data. When you merge CSV files, the resulting output file is going to have all of the information organized in this manner, where the data from one file is added after all of the data that has been previously added. Our article continues below with some additional information on combining multiple CSV files in Windows.
Additional Information on How to Merge CSV Files in Windows
You can quickly find and copy the path to a folder by browsing to that folder in Windows Explorer, then holding down the Shift key on your keyboard, then right-clicking the folder and choosing Copy as path. This whole process works much better if each of the CSV files that you have all contain the same number of columns, and those columns all have the same heading. Once you have combined all of your files, if each file had its own separate header, then those headers will exist at the top of each dataset in the combined file. I usually find it easiest to sort the data alphabetically, then delete the additional instances of the headers.
Additional Sources
This simply allows you to merge files into one single CSV file so that you can more easily sort and edit the data that was originally contained in separate files. If you would like to change the combined file to the Excel file format then you will need to open the file in Excel, select the File tab, then choose the Save As option. There you can click the File type dropdown menu and select the Excel workbook option. The command line basically takes all of the data in each existing sheet and copies it into a separate sheet. It can’t tell if one of those sheets has an empty or hidden column, and just moves through each sheet copying data into the appropriate column on the larger merged file. You can also do this if you would like to rename your original files or any other files. However, you won’t be able to do this if the file that you are trying to rename is currently open in another application.
After receiving his Bachelor’s and Master’s degrees in Computer Science he spent several years working in IT management for small businesses. However, he now works full time writing content online and creating websites. His main writing topics include iPhones, Microsoft Office, Google Apps, Android, and Photoshop, but he has also written about many other tech topics as well. Read his full bio here.
You may opt out at any time. Read our Privacy Policy
