Regardless of the situation, you might need to change the intervals at which your iPhone checks your server for new messages. Our tutorial below will show you where to find and change this setting for the default Mail app on the device.
How to Change the Push Setting for iPhone Mail
Our guide continues below with additional information on how to turn off the push email setting on the iPhone, including pictures of these steps. There are a lot of suggestions for ways to conserve iPhone battery life, and several of them revolve around changing settings for certain services on your device. Many of the biggest battery-consumption culprits are services and features that run in the background to check for new information. One of these features is the Push setting for email. When an email account is configured with the push setting, then it will force email messages through to your device as soon as they are available. However, this means that the device is constantly checking for new email messages, which can wear down your battery life. Luckily this is something that you can turn off, and you can instead configure your iPhone to check for new email messages periodically. Is Google Chrome your browser of choice on your computer? Read our view saved passwords article and learn where to find the passwords that you have saved in Chrome in case you need them on your phone.
How to Switch Push Email Setting on an iPhone (Guide with Pictures)
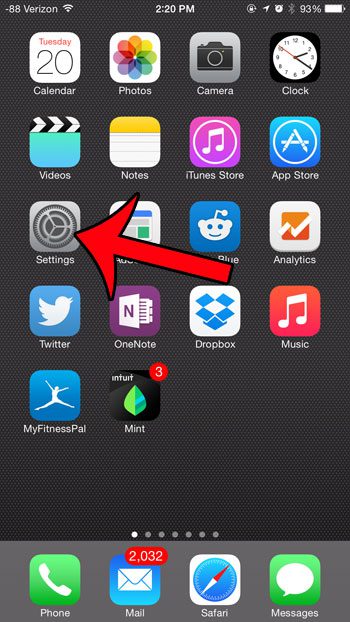
These steps were performed on an iPhone 6 Plus, in iOS 8.1.2. These steps will also be very similar in other versions of iOS. Step 1: Tap the Settings icon.
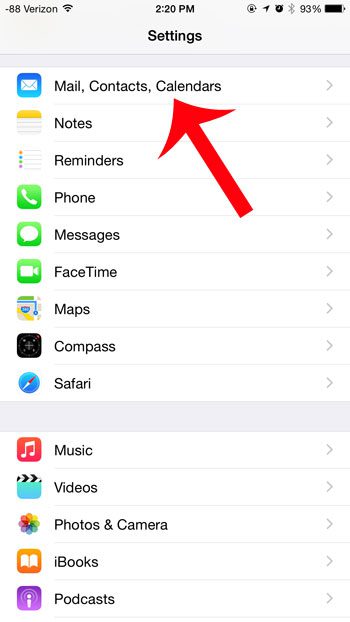
Step 2: Scroll down and select the Mail, Contacts, Calendars option.
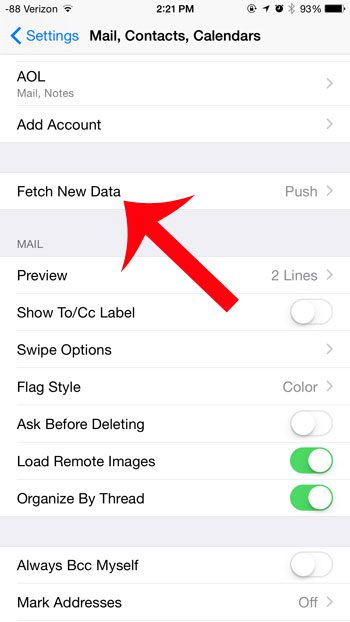
Step 3: Scroll down and tap the Fetch New Data button.
Step 4: Tap the button next to Push at the top of the screen.
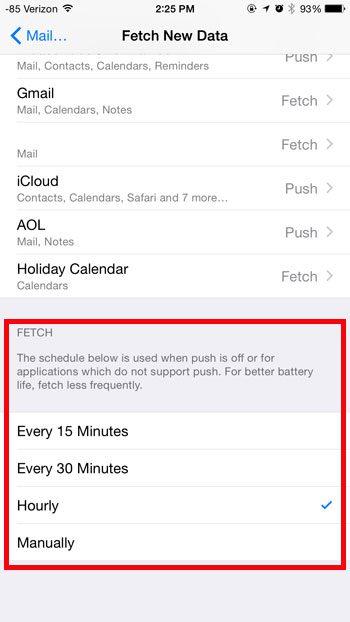
You will know that it is turned off when there is not any green shading around the button, as in the image below. You probably notice that some of the individual email accounts on the screen above still say Push next to them. This is the default setting for some email providers, but will not be used if you have turned off the Push option in the previous step. Instead, it will default to the Fetch settings. You can specify the Fetch settings by scrolling to the bottom of this screen, then choosing an option under the Fetch section. Now that you know how to change the push mail setting on your iPhone you will be able to configure this for the individual accounts on your device so that you can ensure you are receiving important emails as quickly as possible. Do you have an email account on your device that you no longer use? Follow these steps to delete an email account from your iPhone. After receiving his Bachelor’s and Master’s degrees in Computer Science he spent several years working in IT management for small businesses. However, he now works full time writing content online and creating websites. His main writing topics include iPhones, Microsoft Office, Google Apps, Android, and Photoshop, but he has also written about many other tech topics as well. Read his full bio here.
You may opt out at any time. Read our Privacy Policy


