Our article continues below with additional information and pictures for each of these steps. Spreadsheets that span multiple printed pages are very common when you are dealing with large amounts of data. And while that data is often very important, the size of the spreadsheet can become a problem as readers will struggle to understand which columns contain which data. Fortunately there is a way to resolve this by printing your header row at the top of every page in Google Sheets. Common spreadsheet structure involves placing identifying information about that column’s contents in that first row, so repeating it on every page will ensure that information on secondary pages and beyond is a little easier to identify.
See also
How to merge cells in Google Sheets How to wrap text in Google Sheets How to alphabetize in Google Sheets How to subtract in Google Sheets How to change row height in Google Sheets
How to Print the Top Row on Every Page in Google Sheets
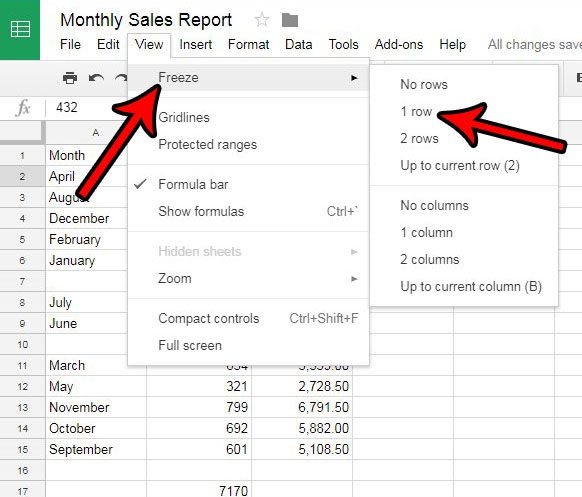
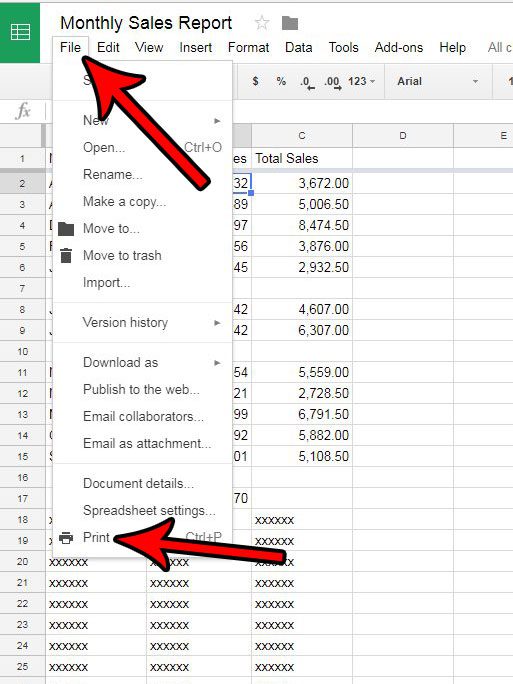
The steps in this article were performed in Google Chrome, in the browser-based version of the application. The result of completing this guide will be a spreadsheet where the top row is repeated on every new page that you print. Step 1: Navigate to Google Drive at https://drive.google.com/drive/my-drive and open the spreadsheet for which you want to print the top row on every page. Step 2: Click the View tab at the top of the window. Step 3: Click the Freeze option, then click the 1 row option. Note that this is also going to modify the display of your spreadsheet on your computer screen by keeping that top row at the top of the sheet, even when you scroll down. Step 4: Click the File tab at the top of the window, then click the Print option. This is going to open the Print Preview window, where you can see how your printed spreadsheet will look. You can then select the Headers & footers option in the right column, then scroll down and select the Repeat frozen rows option if it’s not selected already. If you scroll down to the second page of your sheet you should see that the top row of the spreadsheet is repeating at the top of that page. If you are interested in repeating more than one row at the top of each page, simply select the appropriate option from the Freeze menu that we used in step 3 above. For additional utility, consider adding page numbers. These are located in the Header & footer section at the bottom-right column when you are in the Print Preview window. Simply check the box to the left of Page numbers and they will be included at the bottom of each page. You can click the Edit Custom Fields button if you want to put the page numbers in a different location. Behavior and formatting like this highlights the importance of using header rows when working with a large amount of data. Many spreadsheet applications assume that you will include header data in your spreadsheet, and many other viewers and editors will as well. While there are situations where a header row is impractical or unnecessary, it can often resolve confusion and eliminate mistakes caused by the misidentification of data. You can also achieve the same result in Microsoft Excel, if you use that program, too. Learn how to repeat the top row on every page in Excel and make it a little easier for your audience to understand the information in a multi-page spreadsheet. After receiving his Bachelor’s and Master’s degrees in Computer Science he spent several years working in IT management for small businesses. However, he now works full time writing content online and creating websites. His main writing topics include iPhones, Microsoft Office, Google Apps, Android, and Photoshop, but he has also written about many other tech topics as well. Read his full bio here.
You may opt out at any time. Read our Privacy Policy