If you find the header image to be distracting or problematic, however, then you may be looking for a way to remove it. Fortunately this can be done by editing the header section of the worksheet. Our tutorial below will show you how you can edit this section, plus identify the information in the header that must be deleted to remove the header image.
Delete an Image from a Header in Excel 2010
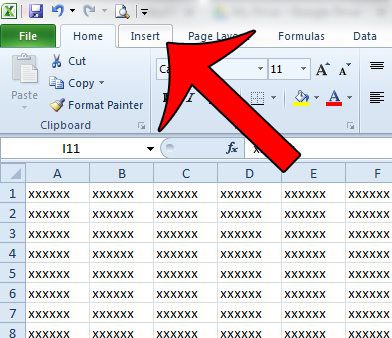
This guide was written specifically for users of Excel 2010. Directions for this procedure are similar for Excel 2007 and Excel 2013, but may vary slightly. Step 1: Open your spreadsheet in Excel 2010. Step 2: Click the Insert tab at the top of the window.
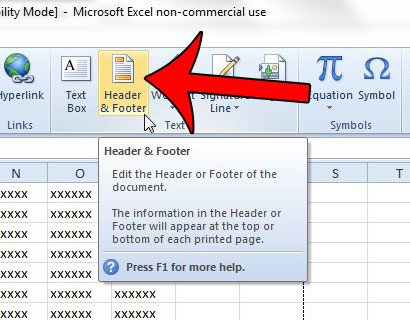
Step 3: Click the Header & Footer button in the Text section of the navigational ribbon at the top of the window.
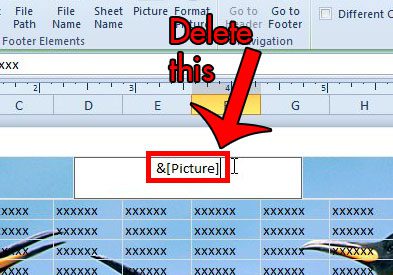
Step 4: Locate the &[Picture] text in one of the sections of your header, then delete that text. If you don’t see this text in your header, then scroll down to the bottom of the page and check the footer. A picture can also be inserted there. If you still cannot find it, then your picture may have been inserted a different way. This article will show you several methods to remove a background picture in Excel 2010.
Would you like to add a picture to one of your cells, then lock it to that cell so it scales and moves with the column and row? Read here to learn how. After receiving his Bachelor’s and Master’s degrees in Computer Science he spent several years working in IT management for small businesses. However, he now works full time writing content online and creating websites. His main writing topics include iPhones, Microsoft Office, Google Apps, Android, and Photoshop, but he has also written about many other tech topics as well. Read his full bio here.
You may opt out at any time. Read our Privacy Policy