One option that is pretty fun is the “Portrait” mode. This picture attempts to separate the foreground subject from the background to create a portrait effect. But your iPhone takes a normal picture and modifies it to achieve this result. So if you would also like to have the original, unaltered “Normal” photo, then follow our tutorial below to see how you can enable that option.
How to Keep Both the Normal Photo and the Portrait Photo on an iPhone 7
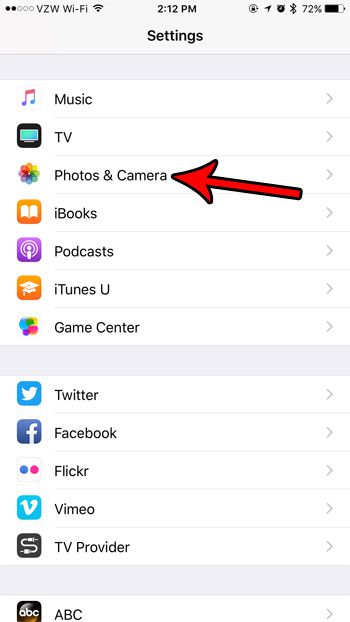
The steps in this article were performed on an iPhone 7 Plus in iOS 10.3.3. By default your iPhone will only save the “Portrait Mode” picture if you use that mode to take a photo on your iPhone. Enabling the option in the guide below is going to cause your iPhone to save that Portrait Mode picture, as well as the version that has not had the “depth” effect applied to it. If you take a lot of these pictures then this can quickly use up your storage space as you will be saving twice as many pictures. Step 1: Open the Settings menu.
Step 2: Scroll down and choose the Photos & Camera option.
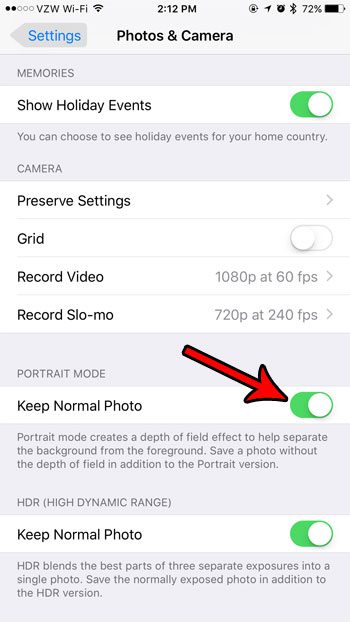
Step 3: Scroll to the bottom of the menu and tap the button to the right of Keep Normal Photo.
Note that this only applies to pictures that you take and select the Portrait mode. If you are running into space issues on your iPhone, then there are some steps you can take to give yourself a bit more room. Read our guide to freeing up iPhone storage space for some tips and tricks. After receiving his Bachelor’s and Master’s degrees in Computer Science he spent several years working in IT management for small businesses. However, he now works full time writing content online and creating websites. His main writing topics include iPhones, Microsoft Office, Google Apps, Android, and Photoshop, but he has also written about many other tech topics as well. Read his full bio here.


