While Photoshop is often thought of as an image editor, it does have a nice selection of tools that can work with letters and numbers. These tools use the default fonts on your computer, meaning that you can add more fonts later, if necessary. Font tools are commonly used when creating items for a website or printed document, so it’s helpful to know how to edit text in Photoshop CS5 so that you can modify the text that exists on a text layer. Photoshop files allow you to work with layers that make it easier to isolate parts of your image, and any text that you add to a Photoshop file will be added as a new text layer. This layer can be modified with the text tool, but it can be a little confusing to understand how everything works when you are attempting to edit an existing text layer. Our article below will show you how.
Changing Content of a Text Layer in Photoshop – Quick Summary
For additional information and images for these steps, continue with the section below.
Edit Text in Photoshop CS5
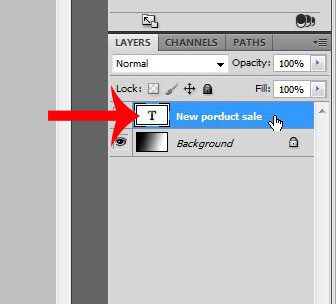
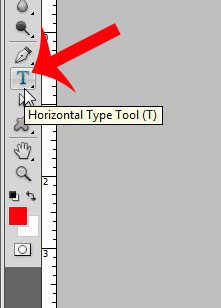
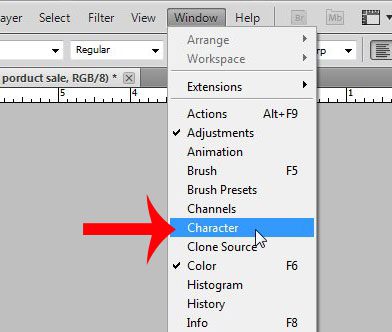
This article is going to teach you how to edit text in Photoshop that is contained as a text layer in your image. If you are working with text that is stored as an image, such as in a .jpg, .png or a rasterized text layer, then any edits that you make to the text will need to be treated as though the text were actually an image. In cases like this, the best solution is typically to erase the existing text with the Eraser tool, then create a new text layer with the Text Type tool. This will allow you to use the editing techniques that we outline below. Note that existing styling applied to the text layer, such as an outline, will remain when editing the text. Step 1: Open your Photoshop file. Step 2: Click your text layer from the Layers panel at the right side of the window. If your Layers panel is hidden, you can display it by pressing F7 on your keyboard. Step 3: Click the Horizontal Type Tool in the toolbox. Step 4: Click on one of the existing letters or numbers in your text layer. Simply clicking near the text layer, instead of inside it, will often create a new text layer, so it’s important to make sure that you are working with the existing layer. Step 5: Delete any unwanted text using the Backspace key on your keyboard and type any new text that you want to add. Step 6: If the Character panel is not visible, then click Window at the top of the screen, then click the Character option. Step 7: Select the text that you want to edit. You can edit individual letters or words, or you can click inside of the text layer, then press Ctrl + A on your keyboard to select all of the text in the layer. Step 8: Click on the option in the Character panel that you want to modify, then choose the new setting for that option. You can change things such as the font, font size, or the font color, and you can also underline, bold, and perform other changes as well. Step 9: Click the check mark in the toolbar at the top of the window to complete editing the text layer. If you are using an uncommon font in your file and need to send it to someone else, then it’s a good idea to convert your text layers to images. This article will show you how to rasterize text in Photoshop so that the text in your images appear as you intend them to on other people’s computers. After receiving his Bachelor’s and Master’s degrees in Computer Science he spent several years working in IT management for small businesses. However, he now works full time writing content online and creating websites. His main writing topics include iPhones, Microsoft Office, Google Apps, Android, and Photoshop, but he has also written about many other tech topics as well. Read his full bio here.
You may opt out at any time. Read our Privacy Policy


