How to Reduce File Size in Powerpoint 2013 By Compressing Media
While this is going to result in significant file size reductions in many cases, it is not always going to solve file size problems. Some very large presentations can only be reduced so far, especially if they are long presentations with accompanying audio files to go with them. But I have seen this tool be very effective before, often reducing some presentations by as much as 90%. Always be sure to save the compressed file with a different name than the original file. Using a different file name will preserve the original file in its’ unaltered state in case the compression has a negative effect on the quality or function of the slideshow. Step 1: Open your presentation in Powerpoint 2013. Step 2: Click the File tab at the top-left corner of the window.
Step 3: Click the Info option in the column at the left side of the window.
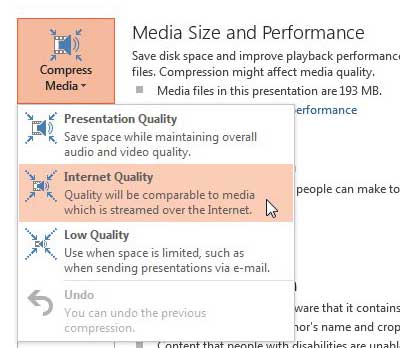
Step 4: Click the Compress Media button at the center of the window, then select your desired level of compression. I usually use the Internet Quality option if it’s something I need to email or upload to a website, but each option will provide a different level of compression and, thus, file size.
Step 5: Wait for the compression to complete. You should see a window like this during the compression process.
As mentioned before, it’s a good idea to now save this compressed version of your presentation with a different name. You can change the color of hyperlinks in Powerpoint 2013 if the default color doesn’t coordinate well with the appearance of the rest of your presentation. After receiving his Bachelor’s and Master’s degrees in Computer Science he spent several years working in IT management for small businesses. However, he now works full time writing content online and creating websites. His main writing topics include iPhones, Microsoft Office, Google Apps, Android, and Photoshop, but he has also written about many other tech topics as well. Read his full bio here.


